Blackmagic URSA 4K to Adobe Premiere Pro workflow

Teme za koje nije još odlučeno gde će biti premeštene...

Moderatori: Video Majstor, Goja, djyova, prijateljv, Ilidan, kadetoni

Opis foruma
Teme za koje nije još odlučeno gde će biti premeštene...

Blackmagic URSA 4K to Adobe Premiere Pro workflow

Postod lauralily520 » 15.05.2015 9:12

The URSA 4K Digital Cinema Camera with active EF Mount from Blackmagic Design features a form factor that is designed to make it flexible enough to use on productions of all sizes. Blackmagic Ursa gives you two recording modes: Apple ProRes 422 HQ and losslessly compressed CinemaDNG RAW. However, something turns to be frustrated; the Blackmagic Ursa 4K ProRes videos are not accepted by Adobe Premiere Pro. This article just aims to give you some tips and tricks for importing and editing Blackmagic URSA 4K in Premiere Pro beautifully.

[Guide]How to Solve Blackmagic Ursa 4K incompatibility issues with Adobe Premiere Pro

As a matter of fact, ProRes in a MOV file format from Blackmagic URSA is beyond the compatibility of Adobe Premiere Pro. What’s more, handling 4K video in Adobe Premiere Pro (CS4/CS5/CS6/CC) is extremely hardware intensive. You can’t get a flawless workflow in most cases. To solve the problem, you need to convert BlackMagic Ursa 4K ProRes files to Premiere Pro supported format like MPEG-2 with Brorsoft 4K Video Converter for Mac.

The program is an easy-to-use yet professional Blackmagic 4K Converter. It’s able to convert 4K ProRes files to Adobe Premiere more compatible format MPEG-2 without quality loss. Plus, this 4K video app can also encode any 4K videos including XAVC/XAVC S, 4K MP4, 4K MOV, etc to FCP, iMovie, Avid Media Composer, etc. For Windows users, please get Brorsoft Video Converter. Just download it and follow the step-by-step guide to get the work done.

1. Download, install and run the BlackMagic 4K Converter Mac; click "Add Videos" icon to load your source videos from Blackmagic URSA.

Slika

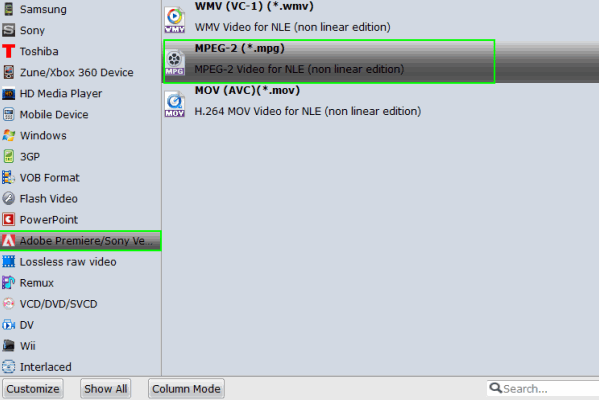
2. Click on the “Format” bar and choose a best editable format. For editing Blackmagic 4K in Adobe Premiere, choose Adobe Premiere/Sony Vegas --> MPEG-2(*.mpg) as output format.

Slika

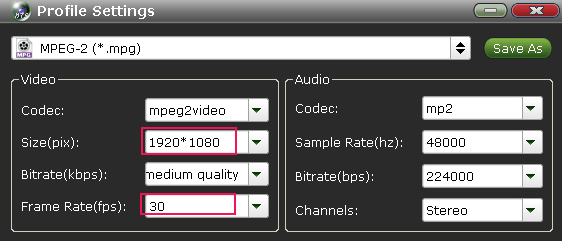
3. Set proper video/ audio parameters. Click the “Settings” button and set proper video/ audio parameters. You can reset set the video size, bitrate and fame rate. You can keep original 4K resolution or adjust video size to 2K or 1080 full HD as you need.

Slika

4. Hit the convert button, it will start converting 4K ProRs 422 (HQ) from Blackmagic URSA to Premiere Pro compatible format immediately. Soon after the conversion, just click “Open” button to get the generated files for natively editing in Adobe Premiere Pro CC/CS6/CS5 perfectly.

More Topics:

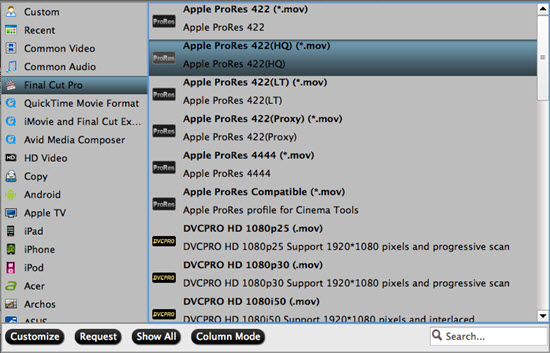
How to Edit 4K in Final Cut Pro
How to Edit 4K in Sony Vegas Pro
Best 4K Ultra HD Video Converter
Best Way to Play Quicktime MOV on Galaxy S6 Edge
Play and Edit iPhone videos on Windows Movie Maker
Editing Nikon 1 V2/D5100/D3100/D800 MOV in Premiere
iPhone videos (H.264) not working in Sony Vegas- Solution
Downscale Blackmagic URSA 4K to 1080p for editing in FCP 7
Convert Sony 3D AVCHD MTS to side-by-side 3D MP4 or MKV
Import Blackmagic DNxHD MXF files to Final Cut Pro 7/X Editing
How to import Tivo videos to iTunes for Easy Playback on iPhone/iPad
Source: Import Blackmagic Ursa 4K footage to Premiere Pro CC/CS6/CS5
lauralily520
Član foruma
 
Postova:  150
Pridružio se:  21.04.2015 4:12

Re: Blackmagic URSA 4K to Adobe Premiere Pro workflow

Postod Andyeric » 22.05.2015 4:22

Edit and Play AS200V XAVC S Videos on Mac Yosemite

It's not strange that you are trapped in editing and playing XAVC S on Mac Yosemite. Especially, if you got a Sony HDR-AS200V camcorder, you may probably on the way to find the best solution to encode and decode XAVC S videos captured by it. Luckily, you can find the useful information in this article.

Slika

As the successor of HDR-AS100V, the new model HDR-AS200V enhanced HD video performance with upgraded stabilization and image quality. Scope of movie shooting is expanded through newly added manual settings and Loop Recording. This in-camera feature Highlight Movie Maker added post shooting enjoyment by producing a short highlight movie with background music immediately at the shooting venue. What a fantastic thing that we can edit and play AS200V XAVC S videos on Mac Yosemite!

Sony announced that it had expanded XAVC to the consumer market with the release of XAVC S. XAVC S supports resolutions up to 3840 × 2160, uses MP4 as the container format, and uses either AAC or LPCM for the audio. As example used in Sony HDR-AS200V, it's wonderful to catch beautiful and high definition scenes with this incredible camcorder! When we want to edit and play attractive XAVC S videos shoot by AS200V, how to? How to encode XAVC S videos? What about decoding XAVC S videos?

Having a lot of XAVC S videos at hand, there are various usages for you. For instance, you can edit XAVC S in FCP X/7/6, iMovie/FCE, Premiere, Avid and so on. On the other hand, you can play XAVC S videos on media player like QuickTime on Mac Yosemite, too. No matter for what, first of all, you need to depend on a Mac XAVC S Video Converter so that you can use to work the conversion job well. Pavtube XAVC S Video Converter for Mac, being specially developed to convert AS200V XAVC S videos to common video format for NLEs and players with no quality loss, is highly recommended here.

Slika Slika

Steps on how to edit and play AS200V XAVC S videos on Mac Yosemite:

Step 1: Download and install the program from the website or click the free trial icon. Then, launch the best Mac XAVC S Video Converter and load your original XAVC S files in with "Add video" or "Add from folder". Directly drag files in is available.

Slika

Step 2: Choose the right output format for editing and playing XAVC S videos on Mac Yosemite. As we mentioned above, taking edit XVAC S in FCP as an example, we would like to introduce you to select the "Final Cut Pro>>Apple ProRes 422 (*.mov)" as your best choice. Apple ProRes 422 (*.mov) and Apple ProRes 422 (HQ) (*.mov) have higher qualities. Apple ProRes 422 (LT) (*.mov) and Apple ProRes 422 (Proxy) (*.mov) have smaller sizes. For other editing software and media player, you can choose the corresponding output format thanks to the preset.

Slika

Step 3: The built-in editing function provided by Mac XAVC S Video Converter is something worth trying. To trim the video, add artistic effects, adjust audio, add watermark, customize video parameters and so on. You can get the work done splendidly. Of course, if you don't think it's a necessary to do, you can skip it and move onto the next step directly.

Step 4: Click the "Convert" button on the main interface if you have done all the preparation work and this is the last step to encode and decode XAVC S videos.

Conclusion: OK, everything is ready, and you can instantly edit and play AS200V XAVC S videos on Mac Yosemite. By the way, we have promoted money saving bundles & deals activity. It really saves a lot! Why not take a look and have a try about high quality products with attractive price?


Further Reading:
Mac MXF Workflow - 2015 Top 5 Best MXF Converters for Mac: MXF is a file format for the exchange of programmer material between servers, tape streamers and to digital archives.
How to Add MKV, AVI, Xvid, Divx, FLV, Flac, WAV Files to iTunes on Mac?: Let me start by saying that iTunes is probably not the best media management project. But it is the best integrated on the Mac OS X.
What is Xperia Z3 supported format? Which is Best Video Converter for Xperia Z3: Xperia Z3 is the most refined version of Sony's smart phones yet. A major change in the design is that it is more compact than Xperia Z2.
Import Samsung NX500 to Avid Media Composer on Mac
[url=Best MXF Converter for Mac Review | Convert MXF on Mac Guide]http://mxfworld.jimdo.com/mxf-converter-review/[/url]


Good News! Pavtube Bundles Dealsare coming! If you want to import/preserve/mix multi-track MXF in MKV/MP4/MOV formats, get multi-track Apple Prores MOV for further editing in Final Cut Pro (X), the following bundled software is your best choice:?
--------Video Converter($35) + MXF MultiMixer($45) = $54.9, Save $25.1 (buy link)
--------Video Converter for Mac($35) + iMixMXF($45) = $54.9, Save $25.1 (buy link)
Go ahead and click the link to get your coupon. Save up to $44.1!Never miss!!!

Slika
Andyeric
Član foruma
 
Postova:  319
Pridružio se:  31.12.2014 9:55

Vrati se na (čekaonica)

Ko je online

Korisnici koji su trenutno na forumu: Nema registrovanih korisnika i 15 gostiju