 od kelly456 » 26.03.2013 8:29
Transcode and Burn Panasonic Lumix FX700 AVCHD on Mac
Summary: Tricks for transcoding
Panasonic Lumix FX700 AVCHD to Mac compatible Codec and
burning AVCHD to DVD on Mac.
The Panasonic Lumix FX700 has semimanual and manual shooting modes and captures 1080i-resolution movies at 30 frames per second (fps) at the press of a button. Its sensor and new image-processing engine make it a fairly quick camera as well. The Panasonic Lumix DMC supports AVCHD footage shooting. And iMovie, Final Cut Pro (FCP X included), FCE, Adobe Premiere Pro, FCE etc. non-linear editing systems isn't able to import the Lumix FX700 AVCHD files so that you can smoothly edit them on your Mac. If you have problems when editing Lumix FX700 AVCHD footage on Mac or want to burn AVCHD to DVD on Mac, just keep on reading the brief how-to.
To get the work done, first you need to transcode Lumix FX700 AVCHD to Mac compatible codec for editing. Here
Pavtube MTS Converter for Mac is highly recommended. It's a professional and powerful high-quality Mac MTS/M2TS converter and editor. With it, you can effortlessly transcode and import Lumix FX700 AVCHD footage to
Avid Media Composer,
Final Cut Pro 7/X and Premiere 5.5on Mac.
Guide: Transcoding Panasonic Lumix FX700 AVCHD to Mac Compatible Codec Step 1. Download, install and run the
Mac Panasonic AVCHD Converter on your Mac, click "Add" or "Add From Folder" to load your Lumix FX700 AVCHD footage.
 Step 2.
 Click the format bar, and move mouse cursor to "Final Cut Pro > Apple ProRes 422 (*.mov)" as output format" for Final Cut Pro 6/7 or FCP X. For iMovie and FCE, you can simply select "Apple Intermediate Codec (AIC) (*.mov)" as output format. For Premiere, Adobe Premiere -> WMV (VC-1) (*.wmv) is right for you. There are also presets for more similar video editing softwares.
 Step 3.
 Click "Convert" button to start Lumix FX700 AVCHD conversion on mac. As soon as the encoding process finished, you can get the final output files and via clicking "Open" button effortlessly. The transcoded Lumix FX700 AVCHD files now are ready for editing and playback on Mac.
If you're looking for ways to burn AVCHD to DVD disc on Mac, read on and you'll get an effective way to finish your task.
Step-by-step Guide - How to transfer and burn AVCHD to playable DVD on Mac Step 1. Download and install
Pavtube DVD Creator for Mac.
Big Sale - Money Saving Software Bundles - Saving Up to $35 - Pavtube Studio Step 2. Run the AVCHD to DVD Burner Mac and import MTS files.
Just click "import" button to open the browse and then you can find AVCHD files you want to burn, it supports batch import.AVCHD file extension can be .mts, .m2ts, .ts, .tp, .tod, .mod, .trp, etc. AVCHD records video at a range of resolutions including 1080p, 1080i and 720p. When burning AVCHD to DVD, select "High Quality" in the burning parameters to ensure the video quality.
 Step 3
. Edit AVCHD Video
Pavtube DVD Creator for Mac enables you to crop, trim, rotate and adjust the effect of the videos. You can add watermarks to illustrate the scenes or give the video a designed music you like.
Step 4. Customize DVD menu and start convert AVCHD to DVD
For a personalized DVD menu, you can change the menu buttons, thumbnails, add background music, custom background image, etc. to customize your DVD menu. Then you can preview your entire DVD movie project to ensure everything is perfect. If ok, pls insert a blank DVD disc into DVD drive, and switch to "Burn" tab. You can choose to burn NTSC or PAL, 5.1 channel is allowed, then click "burn" button to start converting AVCHD to DVD.
With just a few clicks, you can create DVD from AVCHD files with personalized DVD menus, eye-catching video effects and high quality. Just enjoy the AVCHD videos and movies with your family.
P.S. If you have any problem, pls contact with
[email protected] to get more information. You also can leave a message on
Pavtube Community or
Pavtube Facebook, we will answer your questions as soon as possilble.
Buy One Get Another Free? Yes, just join
Pavtube's Special Offer to get the promotion.

Transcode and Burn Panasonic Lumix FX700 AVCHD on Mac
[b]Summary:[/b] Tricks for transcoding [b][url=http://www.pavtube.com/workflow-for-panasonic-camera.html]Panasonic Lumix FX700 AVCHD to Mac[/url][/b] compatible Codec and [b][url=http://www.pavtube.com/guide/convert-burn-avchd-to-dvd-mac.html]burning AVCHD to DVD on Mac[/url][/b].
The Panasonic Lumix FX700 has semimanual and manual shooting modes and captures 1080i-resolution movies at 30 frames per second (fps) at the press of a button. Its sensor and new image-processing engine make it a fairly quick camera as well. The Panasonic Lumix DMC supports AVCHD footage shooting. And iMovie, Final Cut Pro (FCP X included), FCE, Adobe Premiere Pro, FCE etc. non-linear editing systems isn't able to import the Lumix FX700 AVCHD files so that you can smoothly edit them on your Mac. If you have problems when editing Lumix FX700 AVCHD footage on Mac or want to burn AVCHD to DVD on Mac, just keep on reading the brief how-to.
To get the work done, first you need to transcode Lumix FX700 AVCHD to Mac compatible codec for editing. Here [b]Pavtube [url=http://www.pavtube.com/mts-converter-mac/]MTS Converter for Mac[/url][/b] is highly recommended. It's a professional and powerful high-quality Mac MTS/M2TS converter and editor. With it, you can effortlessly transcode and import Lumix FX700 AVCHD footage to [b][url=http://www.pavtube.com/guide/transcode-panasonic-avchd-mts-to-avid-media-composer-dnxhd.html]Avid Media Composer[/url][/b], [b][url=http://www.pavtube.com/guide/import-edit-panasonic-1080-60p-avchd-files-in-final-cut-pro-fcp.html]Final Cut Pro 7/X[/url][/b] and Premiere 5.5on Mac.
[b]Guide: Transcoding Panasonic Lumix FX700 AVCHD to Mac Compatible Codec[/b]
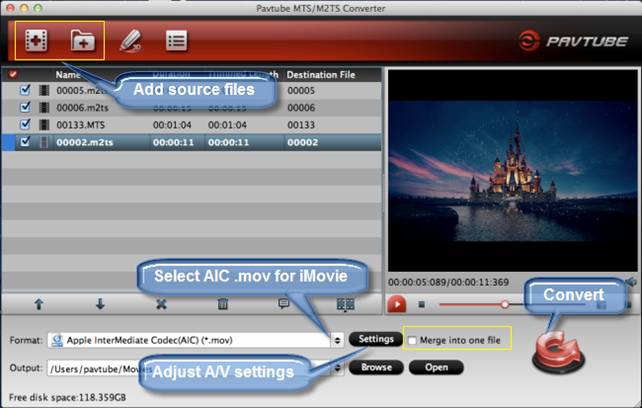
[b]Step 1.[/b] Download, install and run the [b][url=http://www.pavtube.com/mts-converter-mac/]Mac Panasonic AVCHD Converter[/url][/b] on your Mac, click "Add" or "Add From Folder" to load your Lumix FX700 AVCHD footage.
[img]http://image.pavtube.com/img/guide/2012-06/import-avchd-avchd-lite-mts-m2ts-to-imovie/2_clip_image004.jpg[/img]
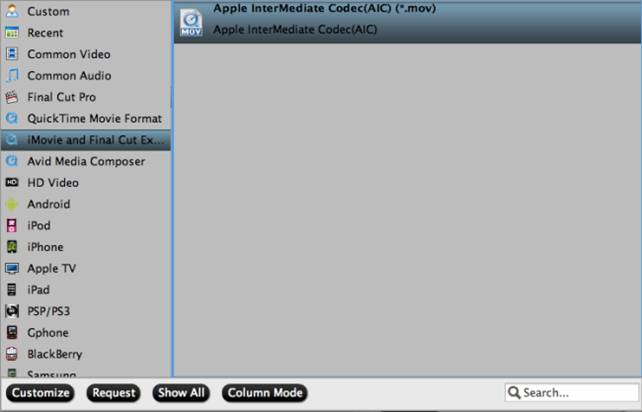
[b]Step 2.[/b] Click the format bar, and move mouse cursor to "Final Cut Pro > Apple ProRes 422 (*.mov)" as output format" for Final Cut Pro 6/7 or FCP X. For iMovie and FCE, you can simply select "Apple Intermediate Codec (AIC) (*.mov)" as output format. For Premiere, Adobe Premiere -> WMV (VC-1) (*.wmv) is right for you. There are also presets for more similar video editing softwares.
[img]http://image.pavtube.com/img/guide/2012-06/import-avchd-avchd-lite-mts-m2ts-to-imovie/2_clip_image006.jpg[/img]
[b]Step 3.[/b] Click "Convert" button to start Lumix FX700 AVCHD conversion on mac. As soon as the encoding process finished, you can get the final output files and via clicking "Open" button effortlessly. The transcoded Lumix FX700 AVCHD files now are ready for editing and playback on Mac.
If you're looking for ways to burn AVCHD to DVD disc on Mac, read on and you'll get an effective way to finish your task.
[b]Step-by-step Guide - [url=http://www.pavtube.com/guide/convert-burn-avchd-to-dvd-mac.html]How to transfer and burn AVCHD to playable DVD on Mac[/url][/b]
[b]Step 1[/b]. Download and install [b][url=http://www.pavtube.com/dvd-creator-mac/]Pavtube DVD Creator for Mac[/url][/b].
[url=http://www.pavtube.com/special-offer.html][b][size=5]Big Sale - Money Saving Software Bundles - Saving Up to $35 - Pavtube Studio[/size][/b][/url]
[b]Step 2[/b]. Run the AVCHD to DVD Burner Mac and import MTS files.
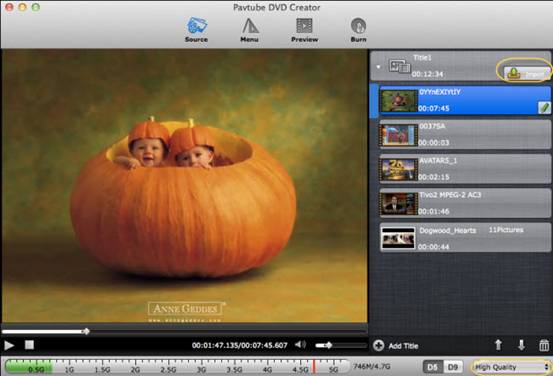
Just click "import" button to open the browse and then you can find AVCHD files you want to burn, it supports batch import.AVCHD file extension can be .mts, .m2ts, .ts, .tp, .tod, .mod, .trp, etc. AVCHD records video at a range of resolutions including 1080p, 1080i and 720p. When burning AVCHD to DVD, select "High Quality" in the burning parameters to ensure the video quality.
[img]http://image.pavtube.com/img/guide/2012-10/burn-avchd-to-dvd-on-mac/1_clip_image006.jpg[/img]
[b]Step 3[/b]. Edit AVCHD Video
Pavtube DVD Creator for Mac enables you to crop, trim, rotate and adjust the effect of the videos. You can add watermarks to illustrate the scenes or give the video a designed music you like.
[b]Step 4[/b]. Customize DVD menu and start convert AVCHD to DVD
For a personalized DVD menu, you can change the menu buttons, thumbnails, add background music, custom background image, etc. to customize your DVD menu. Then you can preview your entire DVD movie project to ensure everything is perfect. If ok, pls insert a blank DVD disc into DVD drive, and switch to "Burn" tab. You can choose to burn NTSC or PAL, 5.1 channel is allowed, then click "burn" button to start converting AVCHD to DVD.
With just a few clicks, you can create DVD from AVCHD files with personalized DVD menus, eye-catching video effects and high quality. Just enjoy the AVCHD videos and movies with your family.
[b]P.S.[/b]
If you have any problem, pls contact with [email=macsupport@pavtube.com]
[email protected][/email] to get more information. You also can leave a message on [b][url=http://community.pavtube.com/pavtube]Pavtube Community[/url][/b] or [b][url=http://www.facebook.com/pavtubefans]Pavtube Facebook[/url][/b], we will answer your questions as soon as possilble.
Buy One Get Another Free? Yes, just join [b][url=http://www.pavtube.com/special-offer.html]Pavtube's Special Offer[/url][/b] to get the promotion.
[url=http://www.pavtube.com/special-offer.html][img]http://pornotubeconverter.com/wp-admin/images/pavtubeconverter/pavtube-2012-special-offer.jpg[/img][/url]