Best way to convert Sony Cyber-shot 1080p mts for editng on Windows or Mac
Surprising!!! Pavtube anounced the new Update and you can get 40% off Special Offer From Pavtube Now!  Summary
: This guide shows you how to move and
transfer Sony Cyber-shot HD AVCHD MTS footage to your local Windows or Mac computer easily and smoothly.
Why We Need to Save or Import Sony Cyber-shot Videos onto Windows or Mac? Cyber-shot is the
Sony's line of point-and-shoot digital cameras introduced in 1996. Cyber-shot model names use a DSC prefix, which is an initialism for "Digital Still Camera". And nowadays, more and more people tend to capture their happiest and sweetest moments with Sony Cyber-shot digital cameras.
We may shoot lots of smooth and sharp HD (high definition) footages during travelling or family time, and we usually expect to save those great movies to our computer rather than locking them in our camera, then
transcode AVCHD MTS to any video formats and edit in video editing programs on Windows like Avid, Adobe Premiere, Sony Vegas, or on Mac like
FCP, FCE, iMove, CyberLink PowerDirector, etc. After reading the below article, you may get a clear instruction about how to get
Sony AVCHD videos on Windows or Mac for video editing later.
How to import Sony Cyber-shot HD AVCHD videos to Windows computer? For Windows users: 1. Turn on the computer.
2. Ensure the recording media with the pictures or movies is inserted in the camera.
3. Connect the supplied USB cable to the camera and the USB input jack on the computer.
4. Turn on the camera.
NOTE: The computer automatically detects the UBS connection from the camera and installs the appropriate driver from the Windows 7 operating system. Afterwards, an AutoPlay window appears on the computer screen.
5. In the AutoPlay window, click Import Pictures and videos using Windows.
6. In the Import Pictures and Videos window that appears, click Import Settings .
7. In the Import Settings window, assign the location on the computer to where you want to copy the picture and movie files.
Next to Import images to click the Browse button and then select the desired folder (for example, My Pictures).
8. Click the OK button.
9. In the Import Pictures and Videos dialog box, click the OK button.
10. Click the Import button.
Tip: There is a problem that AVCHD is not a playable and editable video format for Avid, Adobe Premiere, or Sony Vegas, and transcoding process is necessary. Use
Sony AVCHD MTS Converter to
transcode Cyber-shot MTS to DNxHD MOV for Avid,
import AVCHD MTS to Pinnacle Studio,
convert Sony AVCHD to WMV for Premiere/Sony Vegas and more.
For Mac users: Method 1: You could copy and paste your Sony AVCHD videos via a USB cable to Mac computer. Here are the steps.
Tip : This procedure is helpful when you are not using iMove or some other software application to import your video.
Preparation: You need a Mac computer, your Sony camcorder, and a USB cable.
Step 1: Power on your Mac PC
Step 2: Connect the Sony Camcorder directly to the USB cable on your computer. The Sony Cyber-shot camcorder will display as a hard drive on computer.
Steps 3: Turn on the camcorder, navigate to the Sony Cyber-shot hard drive to access the memory stick, select USB Connect, the LCD will show USB Mass Storage. iPhoto may automatically open, if so, just turn it off.
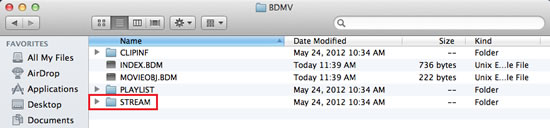
Step 4: On the Finder bar select "Go", and then "Computer". Select "No Name" or untitled item. Select the "AVCHD" folder then "BDMV" folder and on the "STREAM" folder.
Step 5: Click on the video you wanna transfer. If you have multiple videos you would like to transfer, press and hold the "command" key, then select the videos by clicking on them. To copy these files, press and hold the command key and the press the "C" key.
Step 6: Select folder you wanna save the videos. Enter that folder, hold the comman key then press the V key, then your videos are be paste to local computer.
Method 2: You can capture and
transfer Sony AVCHD videos to iMac/MacBook Pro via iMovie after connecting camera to computer with USB cable.
However, you may face problem when trying to log and transfer AVCHD videos from Sony AVCHD to Final Cut Express (FCE) 4 or Final Cut Pro (FCP) 5. After transferring HD .mts videos from camera to computer hard drive, just run
Sony AVCHDConverter for Macas the Mac Sony Cyber-shot AVCHD MTS converter to
convert/deinterlace MTS to Apple ProRes for FCP X,
Import Sony AVCHD MTS to FCE if you want to edit HD videos.
Never miss "Big Sale for Pavtube- Get 40% OFF on Blu-ray/DVD Ripping tools"! Source:
Transcoding Sony Cyber-shot HD AVCHD .mts on Windows or Mac