How to upload Panasonic Lumix FZ200 Videos to YouTube?
How to upload Panasonic Lumix FZ200 Videos to YouTube?
Summary: Read this post you will get to know how to upload Panasonic Lumix FZ200 Videos to YouTube with Highest Quality.
The Lumix FZ200 Digital Camera from Panasonic is Panasonic's latest digital compact camera to offer an f/2.8 aperture across the full range of its zoom. And given that the full range runs to 600mm (in 35mm format), that's saying something. The lens on the FZ200 is a 24x optical zoom lens that starts at the wide angle end as a 25mm and zooms all the way to 600mm. This is an incredible range that encompasses all the focal lengths you could ever need and it offers an f/2.8 aperture at all of those lengths.

Video recording feature
Full HD 1080 60p video recording offers high quality video capture and High Speed Video enables the recording of fast-moving subjects at 120fps (frames per second) and 240 fps! Active Mode and POWER O.I.S enable you to use the incredible zoom capability of the FZ200 in video modes too and all of this is available with noise resistant Dolby Stereo audio recording. Video recording can begin with just the touch of one dedicated button, a one-button switch from still photography to video.
Read more: Panasonic GH2 | Panasonic GH3 | Panasoni TM90| Panasonic TM900 | Panasoni SD900
Upload Panasonic Lumix FZ200 Videos to YouTube with Highest Quality
I often upload videos to YouTube, every time convert Panasonic Lumix FZ200 recorded MTS videos before upload, because the origin videos have big volume and now well supported by YouTube, so I convert it to the appropriate size and MP4 format for playing on YouTube. Here are some tips for you to compress or convert Panasonic Lumix FZ200 video to MP4 format on Mac which is perfectly supported by YouTube.
Software you need:
Pavtube Media Magician
This software will help you to convert Panasonic Lumix FZ200 MTS videos to Youtube H.264 mp4 format. It is also an great video editor, which can help you edit the videos easily.
Step 1: Add source media into Media Magician
There are two ways available to import source media files:
1) Import from camera
Connect your camera with your computer and run Pavtube Media Magician. This camera companion program will detect your camera automatically and ask "Camcorder is connected. Are you ready to launch wizard now?" Click "Yes" to confirm.
Also, you can click the camera icon to load footage directly from a camcorder.

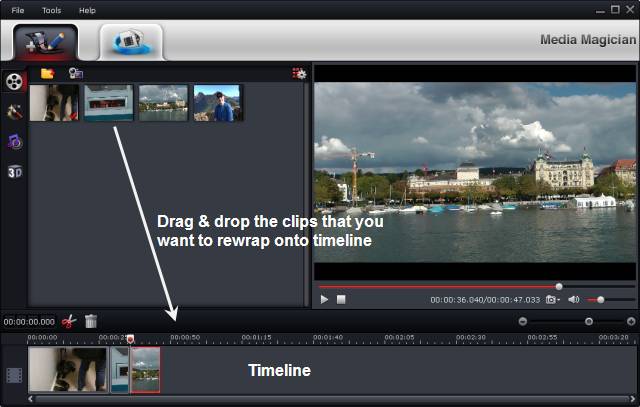
Step 2: Drag and drop source files onto Timeline
After source files are imported into the program, you need to drag and drop the clips that you want to encode onto timeline.
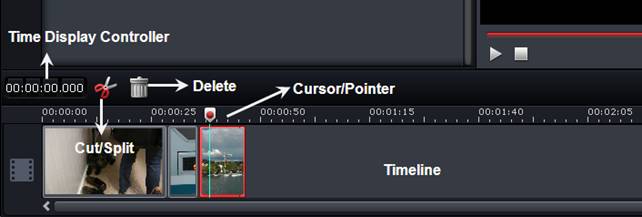
Step 3: Split/Cut/Reorder/Merge source clips (Optional)
If you would like to cut off unwanted parts of your video file, rearrange them in your wanted order, or merge them into one file, you can use the control buttons on timeline to do this.
The control buttons on timeline help you locate frames accurately so that you can cut, trim, delete, and merge video clips in a much easier way.
Furthermore, you can add 3D effects, special effects (e.g. Simple Gauss Blur, Flip Color, Invert, Aged Film, and Gray), or adjust volume, contrast, saturation, brightness of selected clips. You can also flip video horizontally, vertically, and rotate clockwise and counter-clockwise as you like.
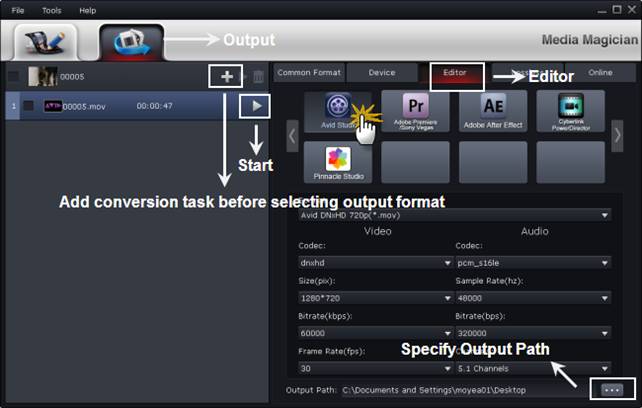
Step 4: Transcode video files to compatible format for YouTube
Choose "Output" in the main interface, and click "Plus" icon to add conversion task before selecting output format. You can choose MP4 format, which is best compatible for sharing on YouTube or other web. Video and audio synchronization is perfectly guaranteed by the Panasonic Lumix FZ200 MTS Converter Mac.
Now, I think you have now how to edit and convert Panasonic Lumix FZ200 MTS videos for upload to YouTube on Mac, just follow the steps and have a try, and then you can share vivid footages on YouTube and catch everyone's eyes.
You can also try Pavtube DVD Creator product for free, which can easily burn AVCHD to DVD disc/ISO files.
Related Guides:
Panasonic AVCHD Converter for FCP
Edit HC-X900/X900M 3D MTS on Mac
Avid and FCE Workflow with Panasonic HC-X800
Panasonic X920 and imovie
Edit Panasonic DMC-FZ200 on Mac
PS. If you have any problem, pls contact with [email=http://[email protected]/][email protected][/email] to get more information. You also can leave a message on Pavtube Community or Pavtube Facebook, we will answer your questions as soon as possilble.
Summary: Read this post you will get to know how to upload Panasonic Lumix FZ200 Videos to YouTube with Highest Quality.
The Lumix FZ200 Digital Camera from Panasonic is Panasonic's latest digital compact camera to offer an f/2.8 aperture across the full range of its zoom. And given that the full range runs to 600mm (in 35mm format), that's saying something. The lens on the FZ200 is a 24x optical zoom lens that starts at the wide angle end as a 25mm and zooms all the way to 600mm. This is an incredible range that encompasses all the focal lengths you could ever need and it offers an f/2.8 aperture at all of those lengths.
Video recording feature
Full HD 1080 60p video recording offers high quality video capture and High Speed Video enables the recording of fast-moving subjects at 120fps (frames per second) and 240 fps! Active Mode and POWER O.I.S enable you to use the incredible zoom capability of the FZ200 in video modes too and all of this is available with noise resistant Dolby Stereo audio recording. Video recording can begin with just the touch of one dedicated button, a one-button switch from still photography to video.
Read more: Panasonic GH2 | Panasonic GH3 | Panasoni TM90| Panasonic TM900 | Panasoni SD900
Upload Panasonic Lumix FZ200 Videos to YouTube with Highest Quality
I often upload videos to YouTube, every time convert Panasonic Lumix FZ200 recorded MTS videos before upload, because the origin videos have big volume and now well supported by YouTube, so I convert it to the appropriate size and MP4 format for playing on YouTube. Here are some tips for you to compress or convert Panasonic Lumix FZ200 video to MP4 format on Mac which is perfectly supported by YouTube.
Software you need:
Pavtube Media Magician
This software will help you to convert Panasonic Lumix FZ200 MTS videos to Youtube H.264 mp4 format. It is also an great video editor, which can help you edit the videos easily.
Step 1: Add source media into Media Magician
There are two ways available to import source media files:
1) Import from camera
Connect your camera with your computer and run Pavtube Media Magician. This camera companion program will detect your camera automatically and ask "Camcorder is connected. Are you ready to launch wizard now?" Click "Yes" to confirm.
Also, you can click the camera icon to load footage directly from a camcorder.
Step 2: Drag and drop source files onto Timeline
After source files are imported into the program, you need to drag and drop the clips that you want to encode onto timeline.
Step 3: Split/Cut/Reorder/Merge source clips (Optional)
If you would like to cut off unwanted parts of your video file, rearrange them in your wanted order, or merge them into one file, you can use the control buttons on timeline to do this.
The control buttons on timeline help you locate frames accurately so that you can cut, trim, delete, and merge video clips in a much easier way.
Furthermore, you can add 3D effects, special effects (e.g. Simple Gauss Blur, Flip Color, Invert, Aged Film, and Gray), or adjust volume, contrast, saturation, brightness of selected clips. You can also flip video horizontally, vertically, and rotate clockwise and counter-clockwise as you like.
Step 4: Transcode video files to compatible format for YouTube
Choose "Output" in the main interface, and click "Plus" icon to add conversion task before selecting output format. You can choose MP4 format, which is best compatible for sharing on YouTube or other web. Video and audio synchronization is perfectly guaranteed by the Panasonic Lumix FZ200 MTS Converter Mac.
Now, I think you have now how to edit and convert Panasonic Lumix FZ200 MTS videos for upload to YouTube on Mac, just follow the steps and have a try, and then you can share vivid footages on YouTube and catch everyone's eyes.
You can also try Pavtube DVD Creator product for free, which can easily burn AVCHD to DVD disc/ISO files.
Related Guides:
Panasonic AVCHD Converter for FCP
Edit HC-X900/X900M 3D MTS on Mac
Avid and FCE Workflow with Panasonic HC-X800
Panasonic X920 and imovie
Edit Panasonic DMC-FZ200 on Mac
PS. If you have any problem, pls contact with [email=http://[email protected]/][email protected][/email] to get more information. You also can leave a message on Pavtube Community or Pavtube Facebook, we will answer your questions as soon as possilble.