FCP 7 Question: Best import settings for Canon C300 .mxf
FCP 7 Question: Best import settings for Canon C300 .mxf to Mac
"Can you let me know which is the best way for Canon C300 to be edited in best quality for FCP? I got Pavtube Video Converter for Mac. Did I GET THE RIGHT ONE OR WOULD OTHER APP DO IT? Many thanks!"
The Canon EOS C300 supports the highest HD quality with Full HD 1920×1080 resolution with Canon XF codec, up to 50Mbps bit rate and 4:2:2 color sampling.Utilizing file-based MPEG-2 compression with an MXF File Wrapper ensures the widest compatibility with existing industry infrastructure, metadata and non-linear editing (NLE) systems. The "MXF" file format, however, is considered as a tough file type for editing. Final Cut Pro (FCP) does not have full support with the MXF format, so you may also face the problem that FCP 6/7 or FCP X does not recognize the Canon C300 .mxf videos.
To make it easier for editing Canon EOS C300 MXF videos on Mac in FCP 6/7/X, you can use either MXF Converter for Mac, or Pavtube's recent release Media Magician for Mac to encode Canon C300 .mxf to Apple ProRes 422, which is a best way for editing Canon C300 footage in FCP. The latter, however, not only converts C300 .mxf to Apple ProRes 422, but also lets you cut unwanted frames precisely, so that you just encode the part your want – this saves your time and energy.
Cut and make Canon C300 .mxf compatible with FCP 6/7/X with Media Magician for Mac
1. Backup Canon C300 MXF footage directly from camera to Mac HDD for use.
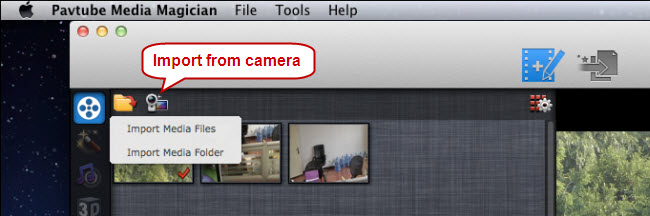
2. Run Media Magician for Mac, choose to "Import Media Files" or "Import Media Folder" to browse and load your .mxf source files from computer.
3. Drag and drop Canon C300 MXF files onto Timeline.
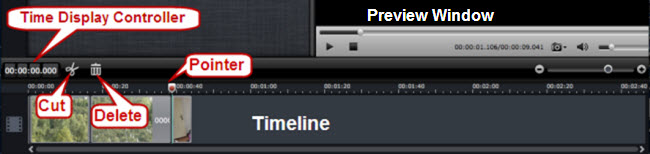
4. Split/Cut/Reorder/Merge MXF clips (Optional)
If you would like to cut off unwanted parts of your MXF clips, rearrange them in your wanted order, or merge them into one file, you can use the control buttons on timeline to do this. The control buttons on timeline help you locate frames accurately so that you can cut, trim, delete, and merge video clips in a much easier way.
5. Choose "Output" on the top of main interface to switch it to output interface.
6. Choose Apple ProRes codec as output format.
For importing Canon C300 MXF video to FCP, follow the steps to set Apple ProRes 422 preset:

a. Move your mouse to Editor, click on the tab.
b. Select "Final Cut Pro" group.
c. The default output format for FCP is Apple ProRes 422. To use other codec in the ProRes family, just select the desire codec (ProRes LT, Pro, HD, ProRes 4444) from the drop-down list of "Format" bar. Set bitrate and frame rate if necessary.
7. Convert Canon C300 .mxf to Apple ProRes video for FCP 7/FCP X.
Press the plus sign (+) to add task for conversion. Select the task(s) and click on the triangle sign to start encoding Canon C300 MXF files to Apple ProRes 422 MOV.

8. Import Apple ProRes 422 MOV to Final Cut Pro.
In Final Cut Pro, follow pull-down menu- File/Import/Files… to import converted Canon C300 footage to FCP without rendering.
MXF Related articles on Pavtube official website:
Convert Canon MXF to FCP 6/7
Import Canon C500 MXF to FCP X
Use AG-HPX600 P2 MXF footage with FCP X
Panasonic MXF to iMovie and FCE
Transcode AG-HPX250 P2 MXF to Avid Media Composer
P2 MXF to Quicktime MOV on Mac and Windows
If you want to burn batch MXF files to DVD disc or ISO files or folder files for backup or watching, you can try Pavtube DVD Creator for Mac, which can burn HD videos to DVD easily.
Buy One Get Another Free?! Yes, just join Pavtube's Special Offers to get the promotion.

PS. If you have any problem, pls contact with [email protected] to get more information. You also can leave a message on Pavtube Community or Pavtube Facebook, we will answer your questions as soon as possilble.
"Can you let me know which is the best way for Canon C300 to be edited in best quality for FCP? I got Pavtube Video Converter for Mac. Did I GET THE RIGHT ONE OR WOULD OTHER APP DO IT? Many thanks!"
The Canon EOS C300 supports the highest HD quality with Full HD 1920×1080 resolution with Canon XF codec, up to 50Mbps bit rate and 4:2:2 color sampling.Utilizing file-based MPEG-2 compression with an MXF File Wrapper ensures the widest compatibility with existing industry infrastructure, metadata and non-linear editing (NLE) systems. The "MXF" file format, however, is considered as a tough file type for editing. Final Cut Pro (FCP) does not have full support with the MXF format, so you may also face the problem that FCP 6/7 or FCP X does not recognize the Canon C300 .mxf videos.
To make it easier for editing Canon EOS C300 MXF videos on Mac in FCP 6/7/X, you can use either MXF Converter for Mac, or Pavtube's recent release Media Magician for Mac to encode Canon C300 .mxf to Apple ProRes 422, which is a best way for editing Canon C300 footage in FCP. The latter, however, not only converts C300 .mxf to Apple ProRes 422, but also lets you cut unwanted frames precisely, so that you just encode the part your want – this saves your time and energy.
Cut and make Canon C300 .mxf compatible with FCP 6/7/X with Media Magician for Mac
1. Backup Canon C300 MXF footage directly from camera to Mac HDD for use.
2. Run Media Magician for Mac, choose to "Import Media Files" or "Import Media Folder" to browse and load your .mxf source files from computer.
3. Drag and drop Canon C300 MXF files onto Timeline.
4. Split/Cut/Reorder/Merge MXF clips (Optional)
If you would like to cut off unwanted parts of your MXF clips, rearrange them in your wanted order, or merge them into one file, you can use the control buttons on timeline to do this. The control buttons on timeline help you locate frames accurately so that you can cut, trim, delete, and merge video clips in a much easier way.
5. Choose "Output" on the top of main interface to switch it to output interface.
6. Choose Apple ProRes codec as output format.
For importing Canon C300 MXF video to FCP, follow the steps to set Apple ProRes 422 preset:
a. Move your mouse to Editor, click on the tab.
b. Select "Final Cut Pro" group.
c. The default output format for FCP is Apple ProRes 422. To use other codec in the ProRes family, just select the desire codec (ProRes LT, Pro, HD, ProRes 4444) from the drop-down list of "Format" bar. Set bitrate and frame rate if necessary.
7. Convert Canon C300 .mxf to Apple ProRes video for FCP 7/FCP X.
Press the plus sign (+) to add task for conversion. Select the task(s) and click on the triangle sign to start encoding Canon C300 MXF files to Apple ProRes 422 MOV.
8. Import Apple ProRes 422 MOV to Final Cut Pro.
In Final Cut Pro, follow pull-down menu- File/Import/Files… to import converted Canon C300 footage to FCP without rendering.
MXF Related articles on Pavtube official website:
Convert Canon MXF to FCP 6/7
Import Canon C500 MXF to FCP X
Use AG-HPX600 P2 MXF footage with FCP X
Panasonic MXF to iMovie and FCE
Transcode AG-HPX250 P2 MXF to Avid Media Composer
P2 MXF to Quicktime MOV on Mac and Windows
If you want to burn batch MXF files to DVD disc or ISO files or folder files for backup or watching, you can try Pavtube DVD Creator for Mac, which can burn HD videos to DVD easily.
Buy One Get Another Free?! Yes, just join Pavtube's Special Offers to get the promotion.
PS. If you have any problem, pls contact with [email protected] to get more information. You also can leave a message on Pavtube Community or Pavtube Facebook, we will answer your questions as soon as possilble.